Configuration for 1C4L
This section provides an example to configure the parameters in 1C4L MIPI driver. The
following code block is an example of the output
file:
dpi_timing = { //800x1280, 24 bits, 59.68 Hz
    .pixelclock   = 66000000,
    .hactive      = 800     ,
    .hfront_porch = 44      ,
    .hback_porch  = 5       ,
    .hsync_len    = 5       ,
    .vactive      = 1280    ,
    .vfront_porch = 5       ,
    .vback_porch  = 5       ,
    .vsync_len    = 5       ,
},
.dsi_timing = {
    .dlanes       = 4        ,
    .bitrate      = 400000000,
    .hsa          = 66       ,
    .hbp          = 64       ,
    .hfp          = 57       ,
    .hact         = 2400     ,
},- For the 1C4L MIPI channel, to support a new screen, it is necessary to modify the
driver file panel-jadard-jd9365da-h3.c under
/Linux/drivers/gpu/drm/panel.This driver file servers as an
i2cdevice by default, and theprobeinterface will use thei2ccommand to read the panel ID, and verify whether the current screen is connected properly based on the return value. When debugging a new screen, there are two cases:- If the
i2ccommand can read the panel ID, theprobefunction needs to support thei2cinterface; Inseed_ panel_ enablefunction, the panel should be enabled according to the specific command ofi2c. - If the
i2ccommand cannot read panel ID, you are recommand to remove thei2crelated command, then theprobeprocess can be completed, so that the screen is in connected status by default.Note: It is necessary to remove alli2cread/write command.
- If the
dpi_timingis the timing of the panel, which needs to be added in the panel driver. It corresponds tocz101b4001_descunder the path of \linux\drivers\gpu\drm\panel.- Enter
starfive_drm_seedpanel.cfile. - Modify the parameters under this function according to the output file.
Figure 1. Modify the Parameters  Tip:
Tip:- clock = pixelclock/1000
- hdisplay = hactive
- hsync_start = hactive + hfp
- hsync_end = hactive + hfp + hbp
- htotal = hactive + hfp + hbp+ hsync_len
- vdisplay = vactive
- vsync_start = vactive + vfp
- vsync_end = vactive + vfp + vbp
- vtotal = vactive + vfp + vbp + vsync_len
- After configuration, it will be synchronized to the DC controller driver and
MIPI DSI driver. For example, to set the lanes to 4,
you can change the corresponding parameters in the input file. The
corresponding driver code is shown in the following figure:
Figure 2. Driver Code 
- Enter
-
Follow the steps below to configure MIPI DSI.
- Open starfive_drm_dsi.c file under the path of \linux\drivers\gpu\drm\verisilicon in Linux.
- Locate cdns_dsi_mode2cfg function to modify the
value of hsa, hbp and
hfp in channel 1 to 66, 64,
57.Note: Modifying parameters should based on the corresponding channel. 1C2L corresponds to channel 0 while 1C4L corresponds to channel 1.
Figure 3. hsa hbp hfp 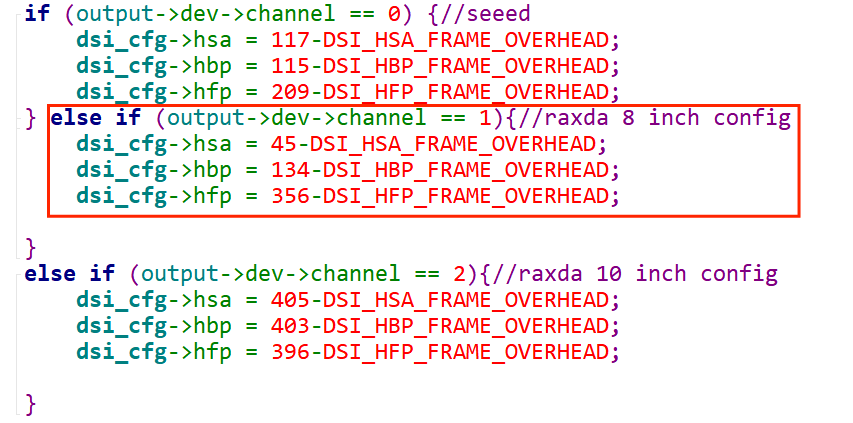
- Then locate cdns_dsi_adjust_phy_config function to
modify the bitrate to 400000000.
Figure 4. Bitrate  Tip: The hs_clk_rate in the figure means bitrate.