Method 1: Using Micro-SD Card
- Insert a micro-SD card to the host PC.
-
Type the following to see the location of the connected micro-SD card.
lsblkFor example, it's
/dev/sdb.Figure 1. Example 
-
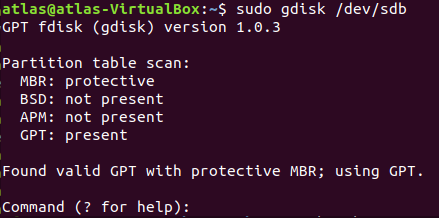
Type the following to enter the partition configuration.
sudo gdisk /dev/sdbFigure 2. Example Output 
-
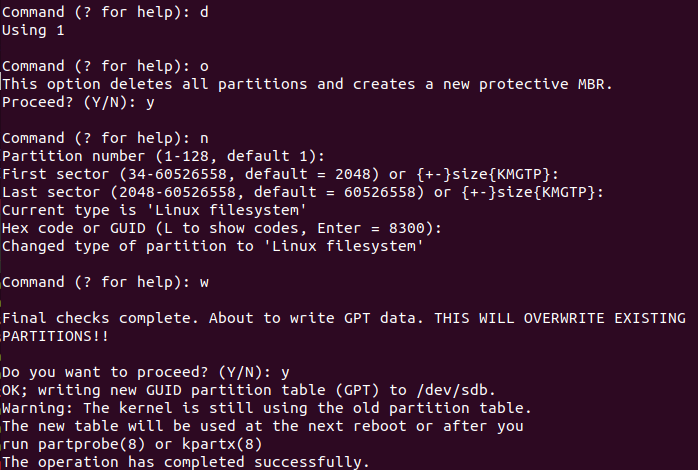
Delete the original partition and then create a new partition by entering the following
respectively.
d--->o--->n--->w--->yFigure 3. Example Command and Output  Tip: Press Enter to keep some settings to default in this configuration.
 -
Format the micro-SD card and create the file system.
sudo mkfs.vfat /dev/sdb1 - Remove the micro-SD card from PC and plug again to mount it.
-
Enter the following to check whether it gets mounted.
df -hYou will see an output as follows and take a note of the mount location.
Figure 4. Example Output 
-
Navigate to the directory containing the 3 images as before.
cd Desktop/compiled -
Copy the files to the micro-SD card by typing the following.
sudo cp Image.gz <Mount_Location> sudo cp rootfs.cpio.gz <Mount_Location> sudo cp <dtb_File_Name> <Mount_Location> syncNote:- <Mount_Location>: the mount location as shown above.
- <dtb_File_Name>: the DTB file for VisionFive
2.Different boards use different dtb files:
- jh7110-visionfive-v2.dtb: for Version 1.2A and 1.3B board.
- jh7110-visionfive-v2-ac108.dtb: for version 1.2A and 1.3B board with ac108 codec.
- jh7110-visionfive-wm8960.dtb: for Version 1.2A and 1.3B board with wm8960 codec.
Tip: You can refer to the silk print on the board for version information.
Example:The following are the example commands:
sudo cp Image.gz /media/user/644C-1D2D/ sudo cp rootfs.cpio.gz /media/user/644C-1D2D/ sudo cp jh7110-visionfive-v2.dtb /media/user/644C-1D2D/ sync - Remove the micro-SD card from PC, insert into VisionFive 2 and turn it on.
-
Open minicom while USB to Serial Adapter is connected between VisionFive
2 and PC, and wait until the
board enters U-Boot mode. You will see the following output when it
is in U-Boot mode.
Figure 5. Example Output 
-
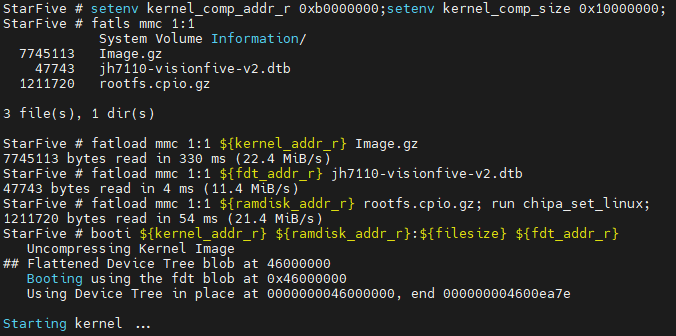
Enter the following commands.
setenv kernel_comp_addr_r 0xb0000000;setenv kernel_comp_size 0x10000000;
fatls mmc 1:1
fatload mmc 1:1 ${kernel_addr_r} Image.gz
fatload mmc 1:1 ${fdt_addr_r} jh7110-visionfive-v2.dtb
fatload mmc 1:1 ${ramdisk_addr_r} rootfs.cpio.gz
run chipa_set_linux;
booti ${kernel_addr_r} ${ramdisk_addr_r}:${filesize} ${fdt_addr_r}
Figure 6. Example Command and Output 
-
Log in by typing the following credentials.
-
Username: root
-
Password: starfive
-
