Using Ethernet
- Connect one end of an Ethernet cable to the VisionFive RJ45 connector, and connect the other end of the cable to a router.
-
Install a TFTP server on the host PC by executing:
sudo apt-get update sudo apt install tftpd-hpa -
Check the server status:
sudo systemctl status tftpd-hpa -
Execute the following to enter the TFTP server:
sudo nano /etc/default/tftpd-hpa -
Configure the TFTP server as follows:
TFTP_USERNAME="tftp"
TFTP_DIRECTORY="/home/user/Desktop/tftp_share"
TFTP_ADDRESS=":69"
TFTP_OPTIONS="--secure"
Note: TFTP_DIRECTORY refers to the directory to storebootloader,ddr init, andu-bootfiles. -
Restart the TFTP server by executing:
sudo systemctl restart tftpd-hpa - Power on the VisionFive and wait until it enters the u-boot mode.
-
Configure the environment variables by executing:
setenv ipaddr 192.168.120.200;setenv serverip 192.168.120.12Note: Generally, the default IP of a router is 192.168.120.1. In this case, use the server IP as the IP assigned by the DHCP server of the router and use the VisionFive IP as 192.168.120.xxx. However, if your router IP is different (for example, 192.168.2.1 ), make sure the server IP and VisionFive IP are in the same IP domain (for example, 192.168.2.xxx). -
Check the connectivity by pinging the host PC from VisionFive:
Example Command:
ping 192.168.120.12Result:The following output indicates that the host PC and VisionFive have established communication on the same network.
Figure 1. Example Output 
-
Connect to SPI Flash:
sf probeExample Output:Figure 2. Example Output  Tip:
Tip:-
In the commands of the following Step 11 to 14:
-
0x90000000refers to the ddr address -
192.168.120.12refers to the TFTP server IP -
0x0refers to the SPI flash offset forbootloader. -
0x10000refers to the SPI flash offset forddrinit. -
0x40000refers to the SPI flash offset foru-boot.
-
-
If VisionFive fails to boot up after restart, refer to the Appendix C: Recovering the Bootloader chapter to recover.
-
-
Update
bootloader:tftpboot 0x90000000 192.168.120.12:bootloader-JH7100-211102.bin.out sf update 0x90000000 0x0 ${filesize}Example Output:Figure 3. Example Output 
-
Update
ddr init:tftpboot 0x90000000 192.168.120.12:ddrinit-2133-211102.bin.out sf update 0x90000000 0x10000 ${filesize}Example Output:Figure 4. Example Output 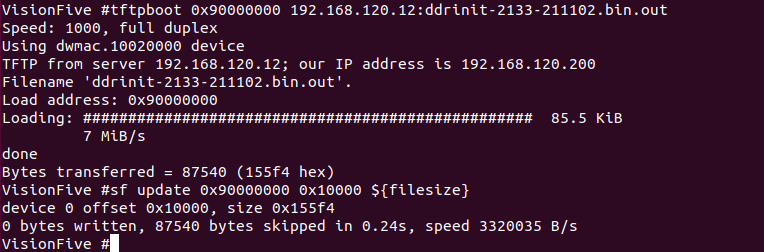
-
Update
u-boot:tftpboot 0x90000000 192.168.120.12:fw_payload_visionfive.bin.out sf update 0x90000000 0x40000 ${filesize}Figure 5. Example Output 
-
Restart VisionFive to make the
updates take effect.
Note: The methods to compile and update u-boot are included in the VisionFive Single Board Computer Software Technical Reference Manual.