Method 2: Using Ethernet Cable
-
Connect an Ethernet Cable from the RJ45 port of VisionFive to a router, connect serial
adapter cable and power on the board.
Note: Make sure the host PC is also connected to the same router using Ethernet or Wi-Fi.
-
Open minicom and wait until the board enters u-boot mode. You will see
the following output when it is in u-boot mode.
Figure 1. Example Output .png)
-
Enter the following commands to set u-boot environment variables.
setenv serverip 192.168.120.12;setenv ipaddr 192.168.120.200;setenv hostname starfive;setenv netdev eth0;setenv kernel_comp_addr_r 0x90000000;setenv kernel_comp_size 0x10000000; setenv bootargs console=ttyS0,115200 earlycon=sbi root=/dev/ram0 stmmaceth=chain_mode:1 loglevel=8Note: Generally, the default IP of a router is 192.168.120.1. In this case, use the server IP as the IP assigned by the DHCP server of the router and use the VisionFive IP as 192.168.120.xxx. However, if your router IP is different (e.g.: 192.168.2.1), the server and VisionFive should follow the IP format of 192.168.2.xxx. -
Check the connectivity by pinging the host PC from VisionFive.
Example:
ping 192.168.120.12Result:If you see the following output, the host PC and VisionFive has established a communication on the same network.
Figure 2. Example Output 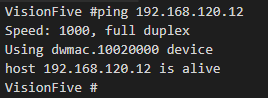
-
Install a tftp server on the Host PC.
sudo apt-get update sudo apt install tftpd-hpa -
Check the status of the server.
sudo systemctl status tftpd-hpa -
Execute the following to enter the tftp server configuration.
sudo nano /etc/default/tftpd-hpa -
Configure the tftp server as follows.
TFTP_USERNAME="tftp"
TFTP_DIRECTORY="/home/user/Desktop/compiled"
TFTP_ADDRESS=":69"
TFTP_OPTIONS="--secure"
Note: The TFTP_DIRECTORY is the directory that we created before with all the 3 images (Image.gz, jh7100-starfive-visionfive-v1.dtb, rootfs.cpio.gz). -
Restart the tftp server.
sudo systemctl restart tftpd-hpa -
Type the following inside the u-boot mode of VisionFive to download the files from the
tftp server of the host PC and start the kernel.
tftpboot ${fdt_addr_r} <dtb_File_Name>;tftpboot ${kernel_addr_r} Image.gz;tftpboot ${ramdisk_addr_r} rootfs.cpio.gz;booti ${kernel_addr_r} ${ramdisk_addr_r}:${filesize} ${fdt_addr_r}Note:<dtb_File_Name>: Different boards use different dtb files, and for the detailed information, refer to the dtb Files table in StarFive 40-Pin GPIO Header User Guide.
Example:The following command is an example for VisionFive:
tftpboot ${fdt_addr_r} jh7100-starfive-visionfive-v1.dtb;tftpboot ${kernel_addr_r} Image.gz;tftpboot ${ramdisk_addr_r} rootfs.cpio.gz;booti ${kernel_addr_r} ${ramdisk_addr_r}:${filesize} ${fdt_addr_r} -
Log in with the following credentials.
-
Username: root
-
Password: starfive
-