Flash OS Image
This section describes how to flash the OS image, either to a Micro-SD card or to the onboard eMMC.
Flash OS to Micro-SD Card
To flash the OS image to a Micro-SD card on Linux or Windows host systems:
-
Download the latest Ubuntu or Debian image from the StarFive Github releases.
-
Extract the image.bz2 file.
-
Insert the Micro-SD card into your OC via a card reader.
-
Download and install BalenaEtcher, which is used for flashing the OS image.
-
Open BalenaEtcher and click Flash from file. Select the extracted .img file: starfive-jh7110S-VF2-Lite-<Version>.img.
-
Click Select target and choose the Micro-SD card.
-
Click Finish to start flashing. Wait until the process completes.
Flash OS to Onboard eMMC
Flash the OS image to the onboard eMMC using Fastboot on Ubuntu.
Hardware Setup
Connect the serial port and USB data cable to VisionFive 2 as follows:
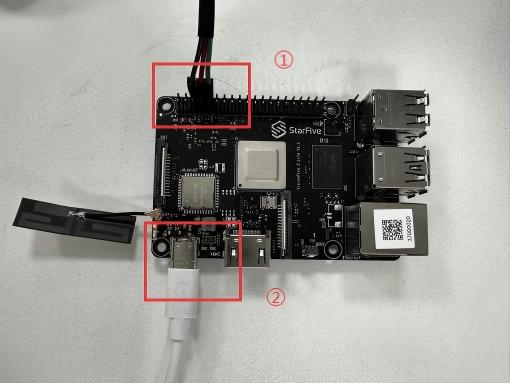
①: Connect the serial port to VisionFive 2 Lite for entering fastboot mode via commands during starup).
②: Connect the USB-C port of the USB-C to USB-A/C cable to the VisionFive 2 Lite, and connect the other end to your PC.
Flash OS to onboard eMMC (Windows)
-
Open the Fastboot tool. Power on VisionFive 2 Lite and enter Fastboot mode via the
fastboot usb 0command. -
Select the burning mode:
- Image: For burning system image files (*.img)
- Kernel: For burning the Linux kernel file (starfive-visionfive2-vfat.part)
- FileSystem: For burning filesystem image files (*.ext4)
-
Select the corresponding image file, for example, ubuntu-24.03-preinstalled-desktop-riscv64+vf2-lite.img.
-
Click Run or Start All to begin flashing. Wait for the progress bar to reach 100%.
-
When complete, restart the board.
Flash OS to onboard eMMC (Ubuntu)
-
Install the Fastboot tool on Ubuntu.
$ sudo apt install fastboot -
(Recommended) Convert the image into a sparse format for faster and more reliable flashing.
$ sudo apt install android-sdk-libsparse-utils $ img2simg StarFive-JH7110-Ubuntu-Noble-Build11.img <output.img> -
Enter Fastboot mode. For details, seeEnter Fastboot Mode.
-
Run the following command to verify the device connection.
fastboot devices -l -
Run the following command to burn the image.
where <output.img> is the image generated in step 2.fastboot flash mmc0 <output.img> -
When complete, restart the board.