Method 1: Directly Replacing DTB File
Prerequisite
Make sure you have executed the steps in Generating DTB.
Execute the following steps under the root directory of Linux to replace the DTB file:
- Insert the micro-SD card to the PC with Ubuntu system, and execute the following command
to check the SD card
partition:
sudo fdisk -l
Example Output:Device Start End Sectors Size Type /dev/sdc1 4096 8191 4096 2M unknown /dev/sdc2 8192 16383 8192 4M unknown /dev/sdc3 16384 221183 204800 100M EFI System /dev/sdc4 221184 4503518 4282335 2G Linux filesystem
In this output, the
/dev/sdc3partition is the SD card partition. - Mount the SD card partition under the mnt file path by
executing:
sudo mount /dev/sdc3 /mnt
- Execute the following commands under the Linux root
directory:
sudo cp arch/riscv/boot/dts/starfive/<DTB_File> /mnt/dtbs/starfive
Tip:Example Command:Different boards use different dtb files:- jh7110-visionfive-v2.dtb: for version 1.2A and 1.3B board.
- jh7110-visionfive-v2-ac108.dtb: for version 1.2A and 1.3B board with ac108 codec.
- jh7110-visionfive-v2-wm8960.dtb: for version 1.2A and 1.3B board with wm8960 codec.
Tip: You can refer to the silk print on the board for the version information.sudo cp arch/riscv/boot/dts/starfive/jh7110-visionfive-v2.dtb /mnt/dtbs/starfive
- Enter /mnt and modify the configuration file
(uEnv.txt) by
executing:
cd /mnt
sudo vim uEnv.txt
fdtfile=starfive/<DTB_File>
Example Command:cd /mnt sudo vim uEnv.txt fdtfile=starfive/jh7110-visionfive-v2.dtb
Figure 1. Example 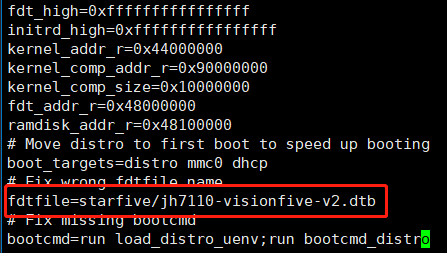
- Unmount the /mnt
directory:
sudo umount /mnt - Remove the micro-SD card from PC and insert it into VisionFive 2, and power on VisionFive 2.
Note: You can also replace the DTB file by performing the following steps:
- Directly copy the DTB file to the /boot/dtbs/starfive directory under the Debian system using a USB drive or through SCP
- Modify the configuration file uEnv.txt. See Step 4.