Log into Debian
Perform the following steps to log into Debian:
-
Connect a display to VisionFive 2 via HDMI.
-
Set the boot mode as required. For instructions, see Determine Boot Mode.
-
Insert the TF card with the Debian image into VisionFive 2 and power it on.
-
Enter the credentials as follows:
- Username: user
- Password: starfive
-
You can log into Debian OS by:
- Log in using Desktop over HDMI
- Log in using SSH over Ethernet
- Log in using a USB-to-Serial Converter
Warning: After log-in, do not runapt upgradeas it overrides the existing customized packages provided by StarFive.
Log in using Desktop over HDMI
-
After the HDMI of the display screen is connected, insert the micro-SD card with the Debian image into the VisionFive 2 and power on.
-
After the desktop login system is displayed, you can use the keyboard and mouse on VisionFive 2.
-
Enter the credentials.
Log in using SSH over Ethernet
To log in to Debian on VisionFive 2 through an SSH connection over the local network.
-
Insert the micro-SD card with the Debian image into VisionFive 2 and power on.
-
Connect one end of an Ethernet cable to the RJ45 connector on the VisionFive 2 and the other end of the cable to a router.
-
After a successful Ethernet connection, your router assigns an IP address to the VisionFive 2 and it is connected to the Internet.
-
For Windows, perform the following steps:
- Log in to your router (usually you need to enter
192.168.1.1on the web browser to enter the router). - Go to DHCP configuration and find the IP address of VisionFive
2. Tip: You can find the IP address of VisionFive 2 by referring to its hostname, starfive.
- Download and install Putty. Putty is an SSH and telnet client through which you can connect to the Carrier Board. You can skip this step if you already have Putty installed.
- Open Putty to log in to Debian.
- Select SSH under the Connection Type.
- Configure the settings as follows and click Open.
- Host Name: IP address of your VisionFive 2
- Port: 22 .
- (Optional) If you need to use the root account for privileged
operations in remote access, perform the following. If you don't
need to login as root user, skip this step.
- Run the following command to configure the SSH
server
echo 'PermitRootLogin=yes' | sudo tee -a /etc/ssh/sshd_config - Restart the SSH
server:
sudo systemctl restart ssh.service
- Run the following command to configure the SSH
server
- Enter the credentials:
user/starfive.Note: If you want to login as root account, userootas the username.
- Log in to your router (usually you need to enter
-
For Mac or Linux, perform the following steps:
- Log in to your router (usually you need to enter
192.168.1.1on the web browser to enter the router). - Go to DHCP configuration and find the IP address of VisionFive 2.
- (Optional) If you need to use the root account for privileged
operations in remote access, perform the following. If you don't
need to login as root user, skip this step.
- Run the following command to configure the SSH
server
echo 'PermitRootLogin=yes' | sudo tee -a /etc/ssh/sshd_config - Restart the SSH
server:
sudo systemctl restart ssh.service
- Run the following command to configure the SSH
server
- Open a terminal and type the
following:
ssh <username>@<VisionFive 2 IP address> - Enter the credentials:
user/starfive.Note: If you want to login as root account, userootas the username.
- Log in to your router (usually you need to enter
Log in using a USB-to-Serial Converter
-
Insert the micro-SD card with the Debian image burnt into VisionFive 2.
-
Connect one end of the USB Type-C cable to the USB Type-C port on the VisionFive 2, and connect the other end of the cable to the power adapter.
-
Connect the jumper wires from the USB-to-Serial converter to the 40-Pin GPIO header of VisionFive 2 as follows.
Figure 1. Connecting Jumper Wires 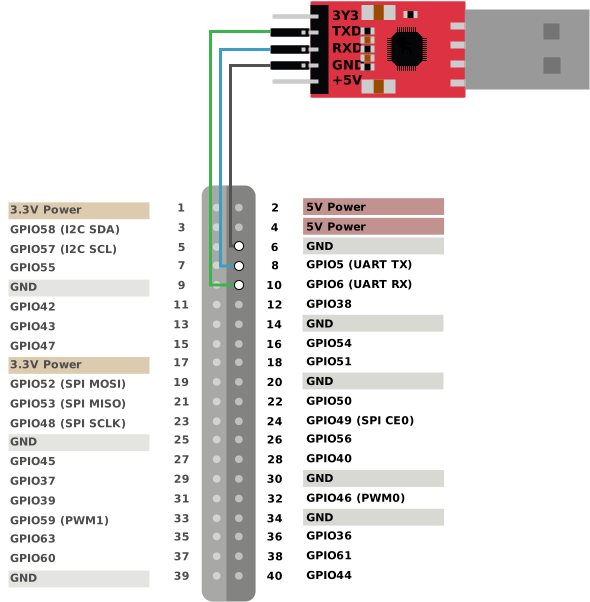
-
Connect the USB-to-Serial converter to the PC.
-
Open Device Manager by typing Device Manager in the windows search box.
-
Expand the Ports (COM & LPT) and find the name of the connected serial port (for example, COM4).
Figure 2. Ports 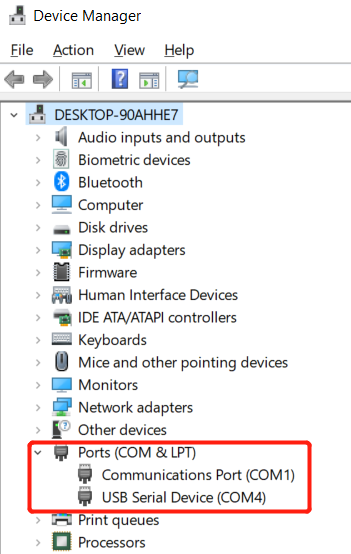
-
Download and install Putty. Putty is an SSH and telnet client through which you can connect to the Carrier Board via SSH. You can skip this step if you already have Putty installed.
-
Open Putty to connect the PC to the Carrier Board.
- Select Serial under the Connection Type.
- Configure the settings as follows:
- Serial line: COM4 (choose your COM port)
- Speed: 115200
Figure 3. Putty Configuration 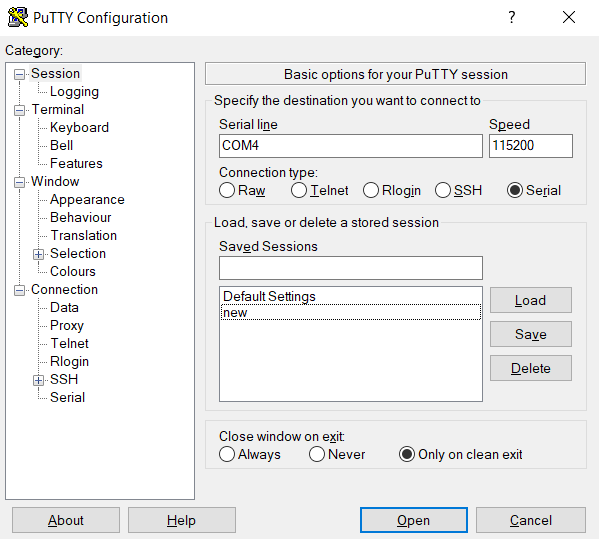
- Click Open.
-
Power on VisionFive 2.
-
Type the username and password in the prompt as follows:
- Username: user
- Password: starfive
userorrootusername.
-
Insert the micro-SD card with the Debian image burnt into VisionFive 2.
-
Connect one end of the USB Type-C cable to the USB Type-C port on VisionFive 2, and connect the other end of the cable to the power adapter.
-
Connect the jumper wires between the USB-to-Serial converter and the 40-Pin GPIO header of the VisionFive 2 as follows.
Figure 4. Connecting Jumper Wires
-
Connect the USB-to-Serial converter to the PC.
-
Open a terminal window on Mac/Linux.
-
Update the packages list by typing the following command:
sudo apt-get update -
Install minicom by typing the following command:
sudo apt-get install minicom -
View the connected serial devices.
dmesg | grep tty -
Connect to the serial device by typing the following command:
The baud rate is set to 115,200.sudo minicom -D /dev/ttyUSB0 -b 115200 -
Power on VisionFive 2.
-
Type the username and password in the prompt as follows:
- Username: user
- Password: starfive
userorrootusername.