I2S Configuration
Configure Kernel Menu for I2S
-
Under the root directory of freelight-u-sdk, run the following command to enter the kernel menu configuration GUI.
make linux-menuconfig -
Enter the Device Drivers menu.
-
Select the Sound Card Support option.
-
Select the Advanced Linux Sound Architecture option.
-
Select the ALAS for SoC audio support option.
-
Select the Synopsys I2S Device Driver option and then select the I2S driver for JH-7110.
Figure 1. Synopsys I2S Device Drivers 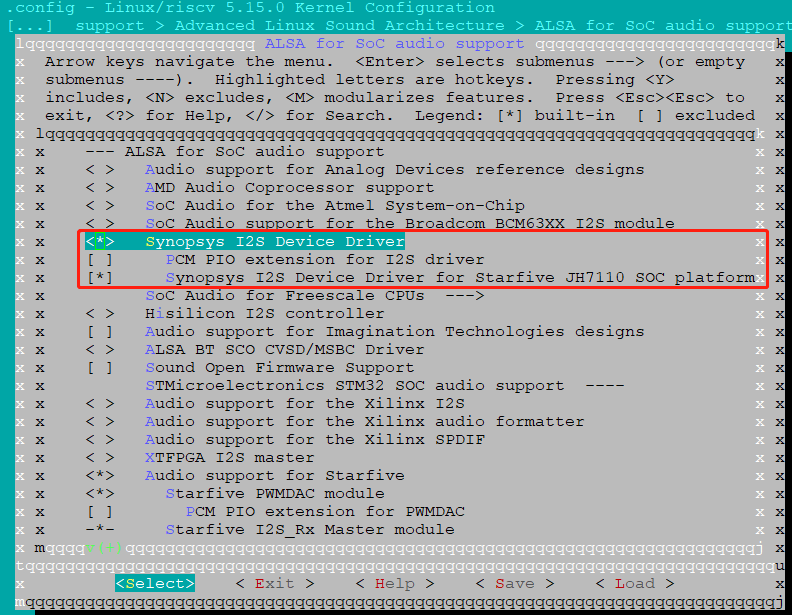
-
Enter the CODEC Drivers menu.
-
Select the AC108 option.
-
Scroll down and select the WM8960 CODEC option.
Figure 2. WM8960 Codec 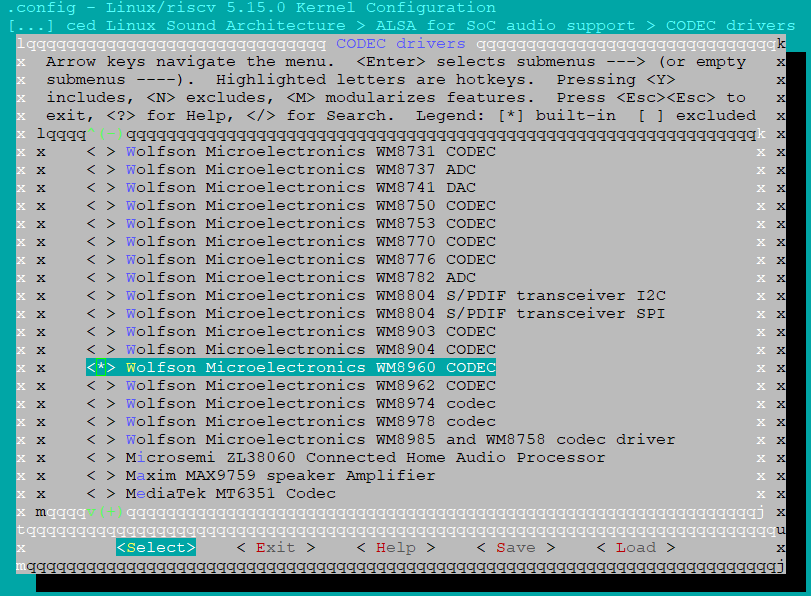
-
Save your change and exit the kernel configuration dialog.
Enable I2S Peripherals
The I2S RX and TX peripherals are disabled by default in the SoC DTSI. Enable them in the board-level DTS file before configuring any codec.
-
Open the board DTS file:
- For WM8960:
freelight-u-sdk/linux/arch/riscv/boot/dts/starfive/jh7110-visionfive-v2-wm8960.dts - For AC108:
freelight-u-sdk/linux/arch/riscv/boot/dts/starfive/jh7110-visionfive-v2-ac108.dts
- For WM8960:
-
Add or modify the following nodes:
&i2srx_3ch { status = "okay"; }; &i2stx_4ch1 { status = "okay"; }; -
Save the DTS files.
Verify I2S Audio Function
The examples below use WM8960
| Action | Command | Output Example |
|---|---|---|
| Check sound card registration |
|
Note: Before a physical codec is
associated with the I2S audio card, all the registered audio
cards are virtual, thus configuration is not needed.
|
| List audio devices |
|
|
| List playback devices |
|
|
| Check playback stream parameters |
|
|
| Check capture stream parameters |
|
|
| List sound card controllers |
|
|
| Verify recording |
|
– |
| Verify playback |
|
– |
| Verify loopback | Loopback is essentially the test channel between TXFIFO and RXFIFO in IC. No external pin connections are required. Once loopback has been enabled, if you can write data in I2S TX, you can read data from I2S RX. The function is usually used in audio data recording scenarios. Use the commands below to validate the loopback function. |
Configure U-Boot
- Use the following command to switch IO voltage to 3.3 V.
mw.l 0x1303000c 0x0 0x1 - Set IP address and gateway address according to actual application
environments. The following code block provides an example based on the test environment.
setenv bootfile vmlinuz; setenv fdt_addr_r 0x48000000; setenv fdt_high 0xffffffffffffffff; setenv fdtcontroladdr 0xffffffffffffffff; setenv initrd_high 0xffffffffffffffff; setenv kernel_addr_r 0x44000000; setenv fileaddr a0000000; setenv ipaddr 192.168.125.211; setenv gatewayip 192.168.125.1; setenv serverip 192.168.125.139; setenv kernel_comp_addr_r 0xb0000000; setenv kernel_comp_size 0x10000000 - Use the following command to boot Linux.
tftpboot ${fdt_addr_r} jh7110-visionfive-v2-pcie-i2s-sd.dtb;
tftpboot ${kernel_addr_r} Im-age.gz;
tftpboot ${ramdisk_addr_r} initramfs.cpio.gz;
booti ${kernel_addr_r} ${ramdisk_addr_r}:${filesize} ${fdt_addr_r};